
AI
Enable extension
To enable the AI extension please visit: How can I add an Extension?
How does the extension work?
The app integrates with the most recent AI image models from the leading providers. The customer can generate new images, or upload their own images to be edited with the AI tools.
You choose which model serves each of the three AI tools, and you can compare models side by side before you decide. See Choosing a model and Evaluation mode.
Config
On the product options config, you can find the AI option type:

Enable the AI Tools you want to offer your customers during the product configuration process:

You can find a template that makes use of the AI Tools to see what is possible with the extension:

Settings
You can find the AI Settings section on the App > Settings page:

Choosing a model
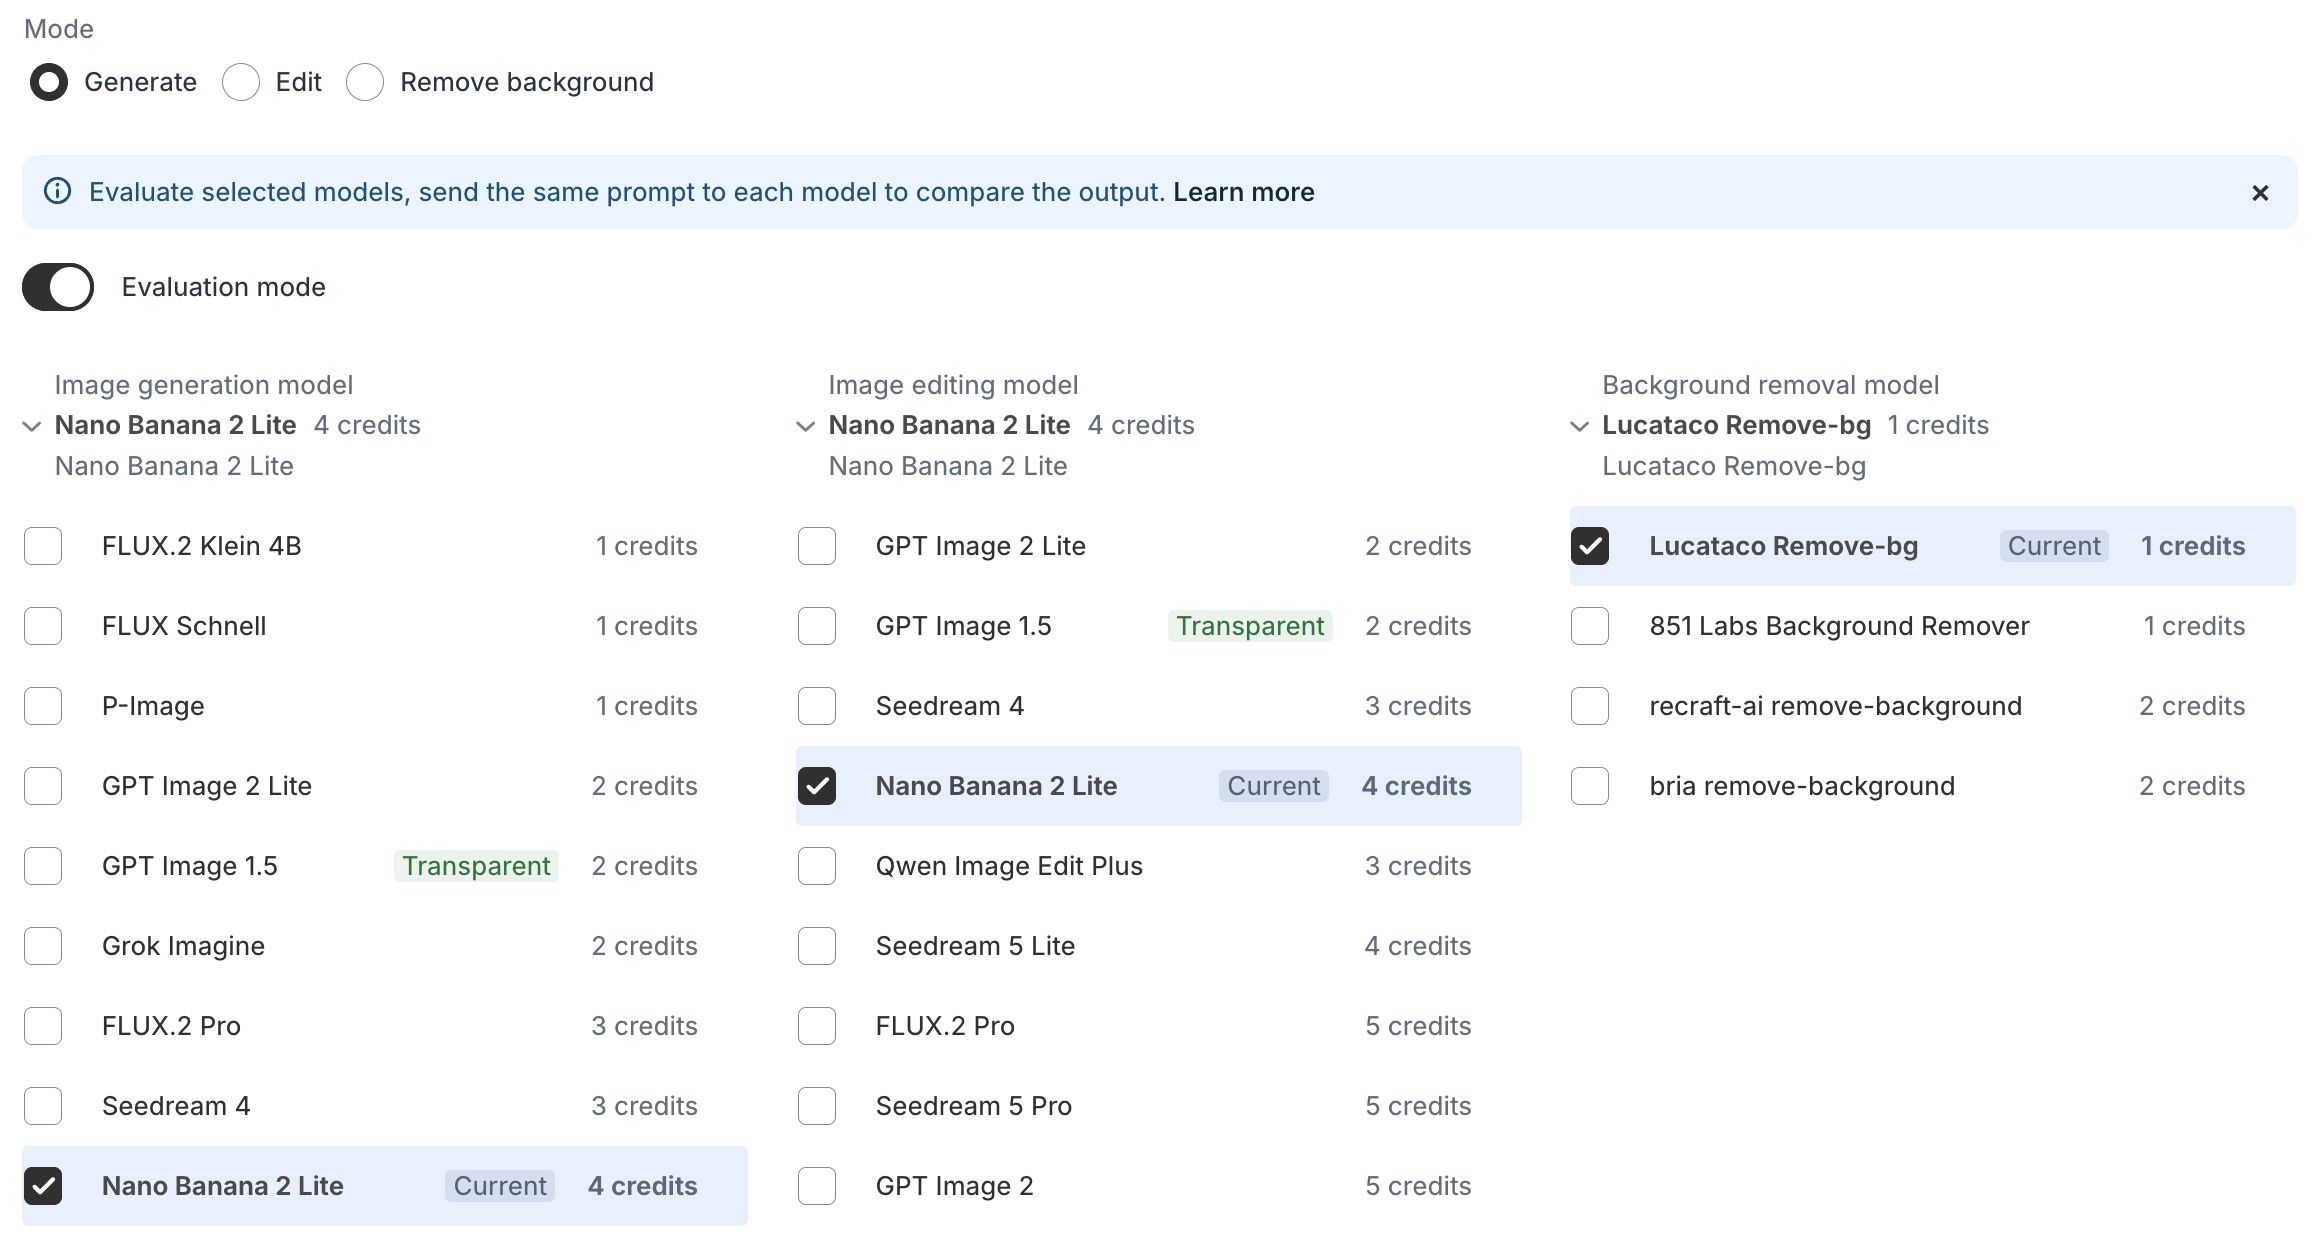
The AI Settings page has one picker per AI tool: Image generation model, Image editing model and Background removal model. Open a picker to see every model available for that tool, cheapest first, each with the credits it charges per image.
Pick the model you want and save. The picker marks your current choice with a Current label, and marks any model that can return a cut-out with a Transparent badge.
If you never choose a model, the app serves a sensible default, so the AI tools work without any setup.
If a model fails
AI providers occasionally fail or time out. When that happens the app automatically retries with the next model in the list, and then with cheaper models below it. You are charged for the model that actually produced the image, and a failed attempt is refunded, so a retry never costs you twice.
Evaluation mode
Evaluation mode runs the same input through several models at once so you can compare their output on your own products instead of picking a model from a description.
Running an evaluation
- Open App > Settings > AI Settings and turn on Evaluation mode.
- Choose the mode you want to test above the pickers: Generate, Edit or Remove background.
- The picker for that tool becomes multi-select. Tick every model you want to compare.
- Enter your prompt, and upload an image for Edit or Remove background.
- Press Generate.
Every selected model runs the same input at the same time. Each one gets a card showing the model name, its credits per image, how long it took, and the image it produced. Click any image to open a larger view and step through the results one by one.
What an evaluation costs
An evaluation is a real run against real models, so every selected model is charged its credits per image. Before the run starts, a confirmation lists each model with its credits, the total, and your current balance. If your balance does not cover the total, the run is blocked and points you to where credits are bought.
Selecting five models for one prompt costs the sum of those five models, not one image.
A model that fails shows as a failed card and its credits are refunded, exactly as a normal request would be.
Using a result
Each finished card has two actions:
- Use this model pins that model for the tool you were testing. Save to keep it.
- Use as Thumbnail takes that image as the thumbnail for the style you are editing.
Evaluation mode is never saved as a setting. It is off every time you open the page, and turning it on does not change what your customers get.
Transparent background
Some models can return an image with a transparent background directly, which means a cut-out without a separate background removal step. Those models carry a Transparent badge in the picker.
When you select such a model, a checkbox appears under the picker: Return images with a transparent background. Tick it and save, and images from that tool come back as cut-outs.
This is best effort by design. Your choice is remembered even if you later pin a model that cannot deliver transparency, it simply has no effect until you pick a capable model again. The app checks each result and reports whether the image really came back transparent, and the storefront uses that to skip a separate background removal when it is not needed, which saves your customer a step and saves you the credits.
Credits
As the app is integrating with external AI providers, each operation that is sent to the AI model has a cost associated with it. The extension uses a credit based system, operations can use different amounts of credits.
How credits are priced
Credits come from what a model costs to run. We do not add a markup on top of the model price, we pass the cost on. A credit is one cent, and a model's credits are its cost rounded up to the next whole credit.
The picker shows the credits per image next to every model name, so you can see what a choice costs before you make it.
Credits per tool
| AI tool | Credits per image | Cost |
|---|---|---|
| Image generation | 1 to 7 | 0.01$ to 0.07$ |
| Image editing | 2 to 7 | 0.02$ to 0.05$ |
| Background removal | 1 to 2 | 0.01$ to 0.02$ |
| Image upscale | 1, or 4 with transparency | 0.01$ or 0.04$ |
These ranges move as models are added and retired. The credits shown in the picker are always current.
Buy credits
After you've enabled the extension, your account will receive 1000 credits once. The credits do not auto-renew each month. 1$ = 100 credits / 1 credit = 0.01$

You can buy credits at any time, the payment is independent of your monthly subscription plan.
Styles
AI styles are predefined prompts that are combined with the customer's input to generate the final image. The style prompts texts are kept private, other users cannot inspect them on the product page.

Style thumbnails
Each style is shown to the customer with a sample thumbnail. The default thumbnails are pre generated with a dog as input image. If this does not match your product, you can replace them with images that match what you actually sell. The thumbnail does not affect what the style generates, it is only a visual reference for the customer.
- Open App > Settings > AI Settings.
- Click Edit on the style you want to change.
- Upload your own image and generate a thumbnail for that style.
- Save the style.
Repeat for each style. Using the same reference image across all of your styles is the easiest way to get a consistent set of cards, since the customer then compares the styles rather than the subjects.
AI Prompt
The AI prompt setting directly on the AI option can be used to generate the final user prompt on the client side (in the browser). The prompt has access to other option values by using the {name} placeholder. This allows to generate a dynamic prompt input for more advanced use cases:


Note: AI prompt is not private, it can be inspected in the browser console. AI Prompt can be combined with AI styles to keep the style prompt private and only include the customer’s input in the AI prompt input.
Image output
All image models outputs are limited to 1024x1024 pixel. The output size is generally limited by the AI image models. There are some models that support higher output, but it would also come at an extra cost.
Image upscale
The app integrates with AI upscaling models to increase the output from 1024x1024 to 4096x4096 (4x).
The upscale is only applied after the product is purchased in an order. This avoids extra costs during the preview phase.
The upscaled version is also used when the Export extension is enabled for the preview export.
To enable upscaling, check the setting on the Advanced tab of the AI option:


Aspect ratio
The default output is 1:1 or when images are edited the input aspect ratio is preserved. Custom output ratio can be configured on the Advanced tab of the AI option:

Supported ratios: 1:1, 2:3, 3:2, 3:4, 4:3, 4:5, 5:4, 9:16, 16:9
The aspect ratio can also reference a single option value for dynamic ratio selection:

API limits
Our API is applying rate limits to prevent abuse of the system and also avoid your credits from being wasted. We currently apply the following per user limits:
5 requests per minute
60 requests per hour
If you want to increase your limits, you can request it via the support button in the app.
We are looking into adding other authentication methods for your customers to login with their email to get increased rate limits.